In the first part article we discussed the first steps for creating and maintaining Citrix Machine Creation Services (MCS). We talked quickly about creating the master image, followed by the available MCS deployment type with their characteristics. In this article we will discuss what happens under the hood when creating a MCS machine catalog per deployment type.
Before we can start using MCS when the master VM is ready is that the hypervisor connection need to be added within Citrix XenDesktop. In this article I’m using Citrix XenServer, but (logically) also VMware vSphere (vCenter required) and Microsoft Hyper-V (SCVMM required) are supported. Later versions also have support for Nutanix Acropolis. Remember when creating this configuration that both specify the storage repository the VDI disks will be created (can be changed later on) and the networking the VDI will be connected (cannot be changed later on).
MCS is embedded when creating a new machine catalog. At this part you need to select Power managed to have MCS support. Within the MCS options you need to select the created Hosting connection (included storage) to start with.

At the next screen you will start with selection the MCS deployment method you would like to use. Let’s do a walkthrough what happens under the hood including some more advanced detailed information.
Pooled VDI (randomly assigned)
Machine Catalog Creation

Let’s start with the randomly assigned VDIs. After you have completed the wizard (I will come back to some insights you can set) the actual process will be started.
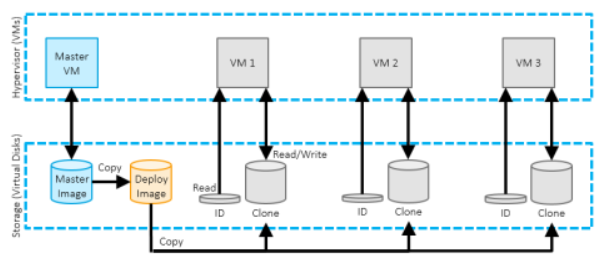
- The first step is to create a snapshot of the master VM, if you have selected a snapshot in the wizard in stead of a VM this step will not be executed.
- When the snapshot is created, a full copy of the Master VM will be made on each storage repository (SR) which is selected in the hosting component. In other words if you selected three storage repositories three copies of the base disk will be made.
- When the copy of the base disk, the base disk is being started in a temporary VM. In this phase Citrix is executing the following tasks: enable DHCP, Windows KMS re-arm and Office KSM re-arm (there is also a part included for the deprecated personal vDisk). This is accomplished by connecting a small disk containing these steps. The VM it self does not have a network connection, so there is no interference with other VMs.

- Next step the AD accounts are created (or reset if you re-use existing AD computer objects
- Followed by the actual creation of VMs on the hypervisor. Each VM will get two disks attached. A unique identifier disk of 16 MB, which XenDesktop creates to provide each VM with a unique identity and a difference disk used to store changes when the user is logged on. If storage support the disk is thin provisioned and can grow to the maximum of the disk size of the Master VM.
Daniel Feller created already a good picture about this as shown below. All the credits for Daniel to create this picture.

Adding additional machines to the Pooled Machine Catalog
When the Machine Catalog is already created you can logically add more VDAs when needed. On the machine catalog you will choose Add Machine. Under the steps 4 and 5 of the new machine catalog are executed again: AD accounts are created and a VM is setup with the identity and difference disks attached.

When a user logs off
As we are talking about pooled VDIs changes made during the user session needs to be reverted. As all changes are stored on the difference disk, so when the machine is restarted the difference is deleted and created again.
Static assigned – Discard Changes
As described in part 1 <<LINK>> the only difference between the random assigned methodology is the assignment of the VDI to the users. Under the hood of XenDesktop there is actually no difference with the random assigned VDI. In other words the steps of creating the machine catalog are 100% identical. The same applies for adding machines and the behavior when the users logs off as changes are discarded.

Static Assigned – Save Changes – Fast Clone
For the static assigned with save changes there are some differences, mainly on the user part. Let’s start with the machine catalog creation. The steps for the random assigned methodology are also used for the fast clone technology. So a basedisk is copied from the master VM, the preparation VM is running, AD accounts are created and the VMs are created with the two disks (identity and difference). Exactly the same for adding additional VMs to stack.

However there is a (big) difference when the user logs off. As changes are retained on the local disk (as shown in figure 8) the difference will not be deleted but kept (as the changes are written down on this disk). Logically when using thin provisioned storage you should keep this in mind and the difference disk will grow during time.
Dedicated – Save Changes - Full Clone
The full clone feature is introduced in XenDesktop 7.11. As the name applies a different cloning technique is being used for creating VDIs. I was pretty enthusiastic when this feature came out, however the added value is not that big. I hoped that we could use the update mechanism for a new version of the basedisk. Unfortunate this is not possible. Of course this feature has advantages. There is a possibility IOPS will be lower in comparison with the Fast Clone technique and the VM can be back-up with almost all regular back-up programs for hypervisors. Let’s take a look at the steps when using the Full Clone feature.
Machine Catalog Creation

- The first step is to create a snapshot of the master VM, if you have selected a snapshot in the wizard instead of a VM this step will not be executed.
- When the snapshot is created, a full copy of the Master VM will be made on each storage repository (SR) which is selected in the hosting component. In other words if you selected three storage repositories three copies of the base disk will be made.
- When the copy of the base disk, the base disk is being started in a temporary VM. In this phase Citrix is executing the following tasks: enable DHCP, Windows KMS re-arm and Office KSM re-arm (there is also a part included for the deprecated personal vDisk). This is accomplished by connecting a small disk containing these steps. The VM it self does not have a network connection, so there is no interference with other VMs.
- Next step the AD accounts are created (or reset if you re-use existing AD computer objects
- The next phase the basedisk will be used to do a full copy of the base disk to a new disk for each VM. Next to this cloned disk also a 16 MB identify disk created. This is best on Thick provisioned storage as the whole disk size is fully reserved directly. There is not connection to the basedisk anymore after the creation (I have tested this by deleting the base disk and the VMs were still functioning).
Again Daniel Filler created a nice picture of this, as shown below.
Adding additional machines to the Catalog
After the Machine Catalog additional VDA can be added. On the machine catalog you will choose Add Machine. Under the steps 4 and 5 of the new machine catalog are executed again: AD accounts are created and a VM is setup with the identity disk and a full copy of the basedisk.
When a user logs off
Just as with the Fast Clone the changes are retained on the disk in this situation on the cloned disk. As the disk space if directly reserved you don’t have to worry about the growth from a hypervisor perspective.
Summarization
In this second part we discussed the steps under the hood for each MCS deployment type when creation the machine catalog, when VDAs are added and what happens when the user session is ended. In the following part we will continue with the steps when updates are required on the base disk and more detailed information about the configuration settings during the Machine Catalog wizard.